Activity: Photo Project
March 28, 2020The following activity is part of our 14-day #eDLProjectShare series. The activity is extracted and modified from our high school, Digital Photography 1a course, Unit 4: The Nature of Light.
Directions:
- Complete the following activity. Use the rubric located below the activity to assess how you are completing each of the required components.
- (Optional): Feel free to share your project progress or the final project with a short video or picture on Twitter or Facebook using the hashtag #eDLProjectShare @eDynamicLearning. *If you are under 18, you must have your teacher or parent or guardian’s permission to post.
- (Optional): For teachers and parents looking to use as a graded activity, a rubric worth 15 points is located at the bottom of the activity.
 Activity: Photo Project: A Short Series Using Light
For this activity, you will need a willing person to be your subject. Using available light, you will take three kinds of photos: an action shot, a portrait, and two still lifes.
Background Information
Have you ever had photos come out looking orange in color? Or maybe have a grey or blue tint to them? The colors you see in an image have certain color temperatures associated with them. (Bonus tip: These temperatures are measured in Kelvins. Research what Kelvin temperature is and how and why it plays a role in photography.) And it’s these colors that we try to “balance.” This is where white balance in digital photography comes in. This is a function that photographers set on their cameras to take amazing and clear pictures by reducing or eliminating color tints. But with the fantastic photo capabilities that our digital phones now have, we can see white balancing in action on them too. (Depending on your phone, you may have the ability to adjust lighting for white balance. You might want to take a look and see if your phone has this capability.) Below are a couple of helpful quick YouTube videos to help you better understand what white balance is in photography:
Action
Take your action shot using natural light. (If you can’t go outside, take it by a window.) Experiment with ways to catch your subject doing whatever movement they enjoy—try different angles, different camera settings, using autofocus or manual focus, and using the zoom to get closer.
Portrait
The portrait of your subject can be indoors or out, but again, experiment and take a few shots to give yourself options to represent this person well.
Still Life
Your still life should be taken indoors. The still life should be a shot of something that represents your subject—maybe their soccer cleat, baseball hat, or a piece of jewelry. Arrange it in an appealing way. Try using the available light and then experiment with adding a light source such as a lamp, an overhead light, or even a portable light like a clip-on. You don’t need to have a professional lighting kit to enhance your lighting—improvise with what you have to make the light look good in the shot. Check your white balance when using available light and then when adding a light—you may need to change the setting or rebalance.
Label and turn in one action shot, one portrait, and two still lifes (you should submit one still life that used only available light and one where you added or changed the lighting). Write a one-page description of your experience, identifying the light sources in each image and specifically addressing how you used the light in each image. Finally, discuss what type of adjustments you made after checking your white balance while take the still lifes.
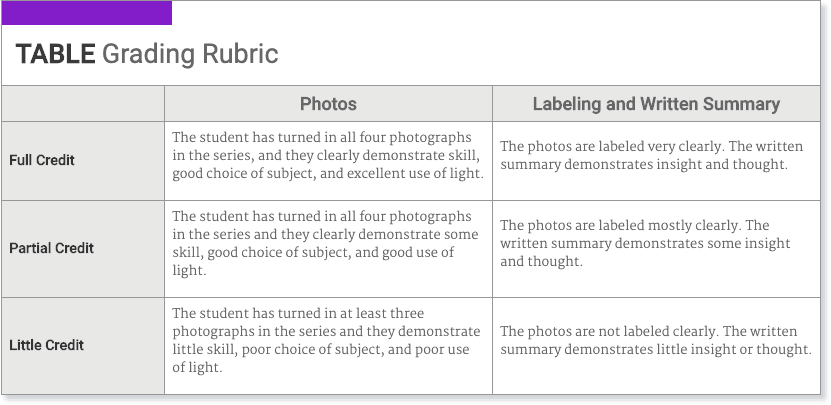
Rubric